Public Service Announcement:
In anticipation of some lovely exciting things I'm planning for this new year I've decided to change my blog name- but instead of just up and changing the URL, I've exported all my old posts and imported them to the new blog:
Unabashed Enthusiasm!
Last night I finally went through and updated (I think) all of the links to the new site, but in case I missed one or two I figured it wouldn't hurt to post this to lead everyone back.
So update your readers (am I on anyone's reader?) and head on over. It's a bit of a blank slate but hopefully that will change soon!
heart,
K
Monday, January 23, 2012


Tuesday, January 17, 2012
Cranberry Ginger Shrub
What is a shrub? It's like a simple syrup...only with vinegar. Does that sound weird? I've become a bit obsessed with tart and spice, so it didn't bother me at all. It may turn people off though- just say it's awesome. They will agree.
I'd been wanting to make a ginger shrub for a while, but since we're in the middle of The Great Cranberry Overbuying Experiment of 2011 (now extended into 2012), it seemed like a good idea to add some of that as well. Our freezer is full. God help us.
Cranberry-Ginger Shrub (recipe slightly adapted from Well-Fed Everyone)
After peeling and dicing the ginger heat up the water and sugar in a nonreactive pot. Once the sugar dissolves, add the ginger and let it simmer for 10 or so minutes to really get the flavor in there.
While that's simmering, rinse and pick through your cranberries. Add them to the pot and simmer, stirring every once in a while. Let it get nice and thick- at least 15 minutes, maybe longer. Then add the vinegar and let it simmer for another five minutes to let the flavors meld.
Take it off the heat and let it cool a bit, then put a strainer over a large bowl and pour the contents of your pot through it. Take a spoon and press down on the berries to get all the lovely juice out. Let it cool on the counter, then pour it into a bottle and stash it in the fridge.
Once it's cool it's great added to seltzer, maybe a little rum if you're in the mood. It's also great added to a bit of warm water. Such a wonderfully versatile beverage, I'll definitely be making more.
I'd been wanting to make a ginger shrub for a while, but since we're in the middle of The Great Cranberry Overbuying Experiment of 2011 (now extended into 2012), it seemed like a good idea to add some of that as well. Our freezer is full. God help us.
Cranberry-Ginger Shrub (recipe slightly adapted from Well-Fed Everyone)
- 1 1/2 cups water
- 1 1/2 cups sugar
- 4 cups fresh cranberries
- 1 giant piece of ginger, peeled and diced (exact amount up to you- I err on the side of way too much)
- 2 cups apple cider vinegar
After peeling and dicing the ginger heat up the water and sugar in a nonreactive pot. Once the sugar dissolves, add the ginger and let it simmer for 10 or so minutes to really get the flavor in there.
While that's simmering, rinse and pick through your cranberries. Add them to the pot and simmer, stirring every once in a while. Let it get nice and thick- at least 15 minutes, maybe longer. Then add the vinegar and let it simmer for another five minutes to let the flavors meld.
Take it off the heat and let it cool a bit, then put a strainer over a large bowl and pour the contents of your pot through it. Take a spoon and press down on the berries to get all the lovely juice out. Let it cool on the counter, then pour it into a bottle and stash it in the fridge.
Once it's cool it's great added to seltzer, maybe a little rum if you're in the mood. It's also great added to a bit of warm water. Such a wonderfully versatile beverage, I'll definitely be making more.
Tuesday, November 29, 2011
Roasted Garlic Rosemary Potato Bread
So at the potluck I went to last month someone brought some amazingly delicious rosemary bread. Not sure if my love of rosemary has made it onto this blog yet- it's not as much of an obsession as ginger, but it's a flavor that makes it into much of what I bake. After tasting that bread I had to find a recipe.
This recipe from Brown Eyed Baker seemed to combine all the things I love in bread. So last weekend I baked up a batch. The result?

Yum...ish.
It was fine, just not the tastiness I was hoping for. I think it needed more salt, maybe some butter. But I'm thinking if I'd used my real mashed potatoes instead of just some leftover baked potato those flavors would've come through more. Or I could've brushed the bread with oil and sprinkled a little salt on before baking. Maybe next time.
The good news- the biga for this was the best dough I'd made since the baking hiatus- the perfect tacky but not sticky consistency.
This recipe from Brown Eyed Baker seemed to combine all the things I love in bread. So last weekend I baked up a batch. The result?

Yum...ish.
It was fine, just not the tastiness I was hoping for. I think it needed more salt, maybe some butter. But I'm thinking if I'd used my real mashed potatoes instead of just some leftover baked potato those flavors would've come through more. Or I could've brushed the bread with oil and sprinkled a little salt on before baking. Maybe next time.
The good news- the biga for this was the best dough I'd made since the baking hiatus- the perfect tacky but not sticky consistency.
Wednesday, November 16, 2011
Pickles!
So...these are refrigerator pickles, not puttin' up pickles. Eventually I'll get one of those canning kits and go crazy, maybe once they go on clearance at Target.
Anyway, these are both delicious, and adaptations from one of my favorite cooking shows I never get a chance to watch anymore: Good Eats. Such a fan of what that show does, and so sad to hear that it's ending soon. Here's hoping it'll go on Netflix streaming, yes?
Spicy Curry Pickled Carrots (adapted from Good Eats)
Ingredients:
Place the rest of the ingredients in a small, non-reactive pot and bring to a boil. Once it's boiled for a few minutes pour the hot liquid over your carrots. I transferred mine from the pot to a measuring cup with a spout for an easy/non-scalding pouring experience. Let cool for a bit, then close the jar and let cool to room temperature before placing in the fridge. Wait a few days before eating.
Rosemary Pickled Beets (adapted from Good Eats)
Ingredients:
Put the sugar, water, apple cider vinegar, salt, garlic, and those rosemary leaves in a small non-reactive pot and bring to a boil. Once the pot has boiled for a few minutes, remove from the heat and pour your brine through a strainer into a measuring cup.
Take the rosemary leaves and garlic from the strainer and mix them with your onions. Then layer the beets and onion mixture in your jar. You'll probably have a bit of each left over. I made a sandwich with mine, with some roasted garlic hummus on the bread and a few slices of cucumber. Very tasty. Anyway-
Pour the brine over the beets and onions, let them cool for a bit, then close your jar and let cool to room temperature before placing in the fridge.
Per the episode, they'll technically be pickles within 12 hours, but they'll taste better if you wait a week. It's hard, I know.
Anyway, these are both delicious, and adaptations from one of my favorite cooking shows I never get a chance to watch anymore: Good Eats. Such a fan of what that show does, and so sad to hear that it's ending soon. Here's hoping it'll go on Netflix streaming, yes?
Spicy Curry Pickled Carrots (adapted from Good Eats)
Ingredients:
- Baby carrots
- 1 cup water
- 1 cup sugar
- 1 1/2 cups apple cider vinegar
- 1 teaspoon garlic powder
- 1 1/2 teaspoon curry powder **(next time I'll add more)
- 1 1/2 teaspoons kosher salt
- 2 teaspoon chili flakes **(next time I'll add more)
Place the rest of the ingredients in a small, non-reactive pot and bring to a boil. Once it's boiled for a few minutes pour the hot liquid over your carrots. I transferred mine from the pot to a measuring cup with a spout for an easy/non-scalding pouring experience. Let cool for a bit, then close the jar and let cool to room temperature before placing in the fridge. Wait a few days before eating.
Rosemary Pickled Beets (adapted from Good Eats)
Ingredients:
- 2 cans sliced beets
- 1 large sweet onion, frenched
- 2 (or 3, or 5) cloves of garlic, smashed
- 2 sprigs rosemary
- 1 cup apple cider vinegar
- 1 1/2 teaspoons Kosher salt
- 1/2 cup sugar
- 1 cup water
Put the sugar, water, apple cider vinegar, salt, garlic, and those rosemary leaves in a small non-reactive pot and bring to a boil. Once the pot has boiled for a few minutes, remove from the heat and pour your brine through a strainer into a measuring cup.
Take the rosemary leaves and garlic from the strainer and mix them with your onions. Then layer the beets and onion mixture in your jar. You'll probably have a bit of each left over. I made a sandwich with mine, with some roasted garlic hummus on the bread and a few slices of cucumber. Very tasty. Anyway-
Pour the brine over the beets and onions, let them cool for a bit, then close your jar and let cool to room temperature before placing in the fridge.
Per the episode, they'll technically be pickles within 12 hours, but they'll taste better if you wait a week. It's hard, I know.
Monday, November 14, 2011
Corduroy and Plaid Clutch
Were you aware that the most corduroy-y Corduroy Day was last Friday? In celebration I finally got around to making a new clutch, as my last one finally died- or at least, the pull came off the zipper and it was getting a bit dingy. I still used it for a month or so despite the hassle, as I always run my bags into the ground.
I used some corduroy I had left from my corduroy tie, as well as some plaid I bought ages ago with a project in mind that never came to fruition.

The lining is that same plaid.
I usually don't take the time to cut things on the bias, but for the plaid it makes the whole thing look so spiffy. Will have to try it with a few other plaids I've been saving.
The pattern is once again based off Noodlehead's gathered clutch tutorial, though I was too lazy to create the gathered front, as well as unsure it would work with this fabric anyhow. Per usual the zipper tabs ended up wonky, though I think less wonky than the first time. I think I finally understand what the directions say, so the third try may actually get the desired result.
And as the project came together so quickly I think I may make an extra to give to a friend. We'll see.
I used some corduroy I had left from my corduroy tie, as well as some plaid I bought ages ago with a project in mind that never came to fruition.

The lining is that same plaid.
I usually don't take the time to cut things on the bias, but for the plaid it makes the whole thing look so spiffy. Will have to try it with a few other plaids I've been saving.
The pattern is once again based off Noodlehead's gathered clutch tutorial, though I was too lazy to create the gathered front, as well as unsure it would work with this fabric anyhow. Per usual the zipper tabs ended up wonky, though I think less wonky than the first time. I think I finally understand what the directions say, so the third try may actually get the desired result.
And as the project came together so quickly I think I may make an extra to give to a friend. We'll see.
Monday, November 7, 2011
TBP: Pumpkin Yeast Bread
The first Wednesday of every month is potluck at my bar (well, not mine per se, but I spend enough time there...). Though I've only been to two before this I seem to by default bring the desserts. First month was a tasty bread pudding using homemade brioche-ish bread, then the second was delicious nutella cookies.
This month I wanted to try some of the skills learned from my awesome Le Pan Quotidien bread class and stuff rolls with chocolate. As it's nearing Thanksgiving and I had leftover pumpkin from my vegan pumpkin cranberry walnut bread, so I looked up some seasonally appropriate recipes.
What turned up? This lovely King Athur Flour recipe. It came together reasonably well, though I tried to keep my dough on the sticky side so there were a few minor freakouts during the kneading process (I'm a bit rusty it seems).
The bread itself turned out delicious- I made a loaf and 14 or so rolls, which I stuffed with some bittersweet chocolate and butter. The final verdict though: needed more chocolate! Also a kitchen scale to help with the uneven (and slightly too big) roll sizes. Will definitely make again though.
The biggest breakthrough came once the rolls were done- the pumpkin flavor was very mild, especially with the chocolate inside, but it gave the bread a nice softness and light golden color. It reminded me of my attempts at potato bread. Well, they were more than attempts- tasty potato bread was, in fact, made- but I never got that orangeish/yellow bread I was looking for. Those breads must have sweet potato in them. Will have to make search for more recipes one of these days...
*FYI- the camera has been found! Expect posts with pictures soon!
This month I wanted to try some of the skills learned from my awesome Le Pan Quotidien bread class and stuff rolls with chocolate. As it's nearing Thanksgiving and I had leftover pumpkin from my vegan pumpkin cranberry walnut bread, so I looked up some seasonally appropriate recipes.
What turned up? This lovely King Athur Flour recipe. It came together reasonably well, though I tried to keep my dough on the sticky side so there were a few minor freakouts during the kneading process (I'm a bit rusty it seems).
The bread itself turned out delicious- I made a loaf and 14 or so rolls, which I stuffed with some bittersweet chocolate and butter. The final verdict though: needed more chocolate! Also a kitchen scale to help with the uneven (and slightly too big) roll sizes. Will definitely make again though.
The biggest breakthrough came once the rolls were done- the pumpkin flavor was very mild, especially with the chocolate inside, but it gave the bread a nice softness and light golden color. It reminded me of my attempts at potato bread. Well, they were more than attempts- tasty potato bread was, in fact, made- but I never got that orangeish/yellow bread I was looking for. Those breads must have sweet potato in them. Will have to make search for more recipes one of these days...
*FYI- the camera has been found! Expect posts with pictures soon!
Friday, November 4, 2011
The Bread Project: Vegan Pumpkin Quickbread with Cranberries and Walnuts
I have ten bags of cranberries in my fridge and freezer. No kidding. They were 49 cents a bag at the Target by me for some reason, so we stocked up. Some of them may be used for a beer D is in the planning stages of, but that still leaves at least five bags, probably more if they're still cheap next time I go. Clearly I have a problem. So expect a lot of cranberry-based posts while we work through it all.
We also had canned pumpkin which needed to be used, and the thought crossed my mind to make something vegan. So foodblogsearch.com searching commenced and turned up a recipe easily incorporating both.
Vegan Pumpkin Walnut Cranberry Bread and Muffins (slightly adapted from Joy the Baker)
I was able to get a smaller loaf and 18 muffins, though you could probably to a regular loaf and 12 muffins. Baked them together- the muffins were done in about 25 minutes, the loaf in about an hour. I probably took them out on the early side just to keep the bread moist, as I'd read sans eggs it can get a bit crumbly.
As is- super delicious. Next time I'll add more walnuts and cranberries though. You can probably even forgo telling people it's vegan, unless like me you have a vegan coworker who usually cannot partake in foods people bring in to work.
*Note: apologies for the lack of pictures. My camera has gone missing, and my cell phone's is just awful. Hopefully will find it soon! Or Black Friday's coming up so maybe I'll just get a new one.
We also had canned pumpkin which needed to be used, and the thought crossed my mind to make something vegan. So foodblogsearch.com searching commenced and turned up a recipe easily incorporating both.
Vegan Pumpkin Walnut Cranberry Bread and Muffins (slightly adapted from Joy the Baker)
- 2 cups all-purpose flour
- 1 1/2 cups whole wheat flour
- 2 cups dark brown sugar, packed
- 1/3 cups sugar
- 2 tsp baking soda
- 1 tsp baking powder
- 1 tsp salt
- 1 tsp nutmeg
- 1 tsp cinnamon
- 1/2 tsp ginger
- 1/2 tsp cloves
- Scant 2 cups of pumpkin puree (canned or freshly roasted, if you're all fancy)
- 1 cup vegetable oil
- 1/3 cup maple syrup
- 1/3 cup water
- 1 cup chopped walnuts
- 1 cup roughly chopped cranberries
I was able to get a smaller loaf and 18 muffins, though you could probably to a regular loaf and 12 muffins. Baked them together- the muffins were done in about 25 minutes, the loaf in about an hour. I probably took them out on the early side just to keep the bread moist, as I'd read sans eggs it can get a bit crumbly.
As is- super delicious. Next time I'll add more walnuts and cranberries though. You can probably even forgo telling people it's vegan, unless like me you have a vegan coworker who usually cannot partake in foods people bring in to work.
*Note: apologies for the lack of pictures. My camera has gone missing, and my cell phone's is just awful. Hopefully will find it soon! Or Black Friday's coming up so maybe I'll just get a new one.
Saturday, October 29, 2011
TBP: Banana Bread & Brioche-ish Bread

The snowstorm going on outside my window at the moment reminded me some of bread I'd made a few months ago and never blogged about. It was day of the hurricane, and as the power can sometimes be fickle at the apartment, D and I decided to use up as many perishables as possible. That meant eggs and butter that could possibly go to waste, so I put them to good use making potatoy egg bread. There was also banana bread (middle bottom).
I went a little crazy over that dud of a hurricane.
Recipe #1: Brioche-ish (from Epicurious)
So I guess this isn't necessarily a brioche, but there are eggs and butter, so I'm going to call it that. Textually it reminded me of brioche, and it was nice and sweet. The recipe says two loaves but I was able to get three decent sized ones out of it. D & I ate the smallest, the one on the left was brought to my fav bar, and the one on the right was frozen and later turned into a seriously delicious bread pudding for a potluck at the same bar haha.
I think this was the largest amount of dough I'd worked with at once- eight cups of flour! But it came together well and I loved the resulting bread. Will probably make it again at some point.
Recipe #2: Banana Feather Loaf (from The Bread Bible)
My previous try at a yeast banana bread was pretty delicious. So when I saw this recipe from The Bread Bible I had to give it a try. The loaf was very different, obviously- light and sweet, banana flavor only especially pronounced when you toasted it. Very good for peanut butter sandwiches, or just warmed with butter.
As it was I made far too much bread that day. Definitely kept that in mind during this snowstorm- though I did bake, and may post about it later, assuming I can find my camera. Don't hold your breath though haha.
Friday, October 28, 2011
TBP Week...???: Le Pain Quotidien Bread Class
It's been a very long time since I posted, I'm aware. Life got in the way a bit of bread, and although there were some loaves I did make and just never got around to taking pictures of and posting, there were a lot of weeks I just didn't have the time. Hopefully things will settle down so I can get back on track.
One thing that should hopefully help was a wonderful (wonderful!) bread class I took at Le Pain Quotidien. It was the Bread Basics class, and you can sign up for that and a few more here.
Yes, you read that right: Bread Basics. No, I didn't learn a ton I didn't know already. The main things were shaping (which I never really paid attention to) and the reminder that making bread isn't terribly hard. Also we stuffed bread with chocolate and nuts and other delicious things, which I now will have to try. But it was three hours of bread with a professional fancy oven, and we had to take home everything we made. And some people didn't take home their share so I got extra.
Here were the spoils:
Not pictured: the pizza we made in class and ate for dinner. Also the pizza dough we made to take home. Also how happy I was.
Very highly recommended. And apparently they have classes in LA now!
One thing that should hopefully help was a wonderful (wonderful!) bread class I took at Le Pain Quotidien. It was the Bread Basics class, and you can sign up for that and a few more here.
Yes, you read that right: Bread Basics. No, I didn't learn a ton I didn't know already. The main things were shaping (which I never really paid attention to) and the reminder that making bread isn't terribly hard. Also we stuffed bread with chocolate and nuts and other delicious things, which I now will have to try. But it was three hours of bread with a professional fancy oven, and we had to take home everything we made. And some people didn't take home their share so I got extra.
Here were the spoils:
 |
| baguette two ways |
 |
| rolls stuffed with chocolate and butter, whole wheat bread with walnuts and apple |
Not pictured: the pizza we made in class and ate for dinner. Also the pizza dough we made to take home. Also how happy I was.
Very highly recommended. And apparently they have classes in LA now!
Monday, September 5, 2011
The Bread Project Week 11: Pitas (and failing)
Pitas are awesome!
...I guess I should say more than that though.
For a while there I always had some (store-bought ones) on hand. If not for sandwiches, then to toast them up to eat with hummus. So it was natural that I'd want to make my own. As it happened, I ended up making two batches: one from The Bread Bible, the other from A Bread A Day, which is an old site, but I may have to start reading through it for more ideas. Daily bread would be lovely, if only there were another three or four hours in a day.
Anyway, neither ended up being traditional pocket pitas, but I'm pretty sure that was my fault. They were still delicious though, and went well with falafel, which I made myself (did you know you could do that??), adapting a recipe from from another Bread a Day post.

Recipe #1: The Bread Bible Pitas
I picked this recipe because she said you could keep the dough in the fridge for up to three days, and I'd hoping some kind of sourdough-ness would develop. That didn't happen. Oh well.
The dough came together fairly easily but was very wet. When I attempted to roll it out, all it did was stick to my rolling pin. I read through the recipe again for ideas and noticed she mentioned how similar it was to her pizza dough, so I just stretched it out with my fingers. So much fail in that idea- the width was uneven, and while it did puff up a bit the thin sections prevented it from reaching its full potential. It's very good for pita pizzas though.
Recipe #2: Whole Wheat Pitas from A Bread A Day
This was a dryer dough that came together easily. I actually adapted it slightly- she let her sponge sit for four hours, I adjusted the starting flour amounts a bit, nixed the early dose of honey (just added it a bit later) and let it sit in my fridge while I was at work. These rolled out a lot easier but again didn't puff. I'm assuming my dough was too dry?
Will definitely be trying these again, I'm a big fan of the quick cooking times for both recipes.
...I guess I should say more than that though.
For a while there I always had some (store-bought ones) on hand. If not for sandwiches, then to toast them up to eat with hummus. So it was natural that I'd want to make my own. As it happened, I ended up making two batches: one from The Bread Bible, the other from A Bread A Day, which is an old site, but I may have to start reading through it for more ideas. Daily bread would be lovely, if only there were another three or four hours in a day.
Anyway, neither ended up being traditional pocket pitas, but I'm pretty sure that was my fault. They were still delicious though, and went well with falafel, which I made myself (did you know you could do that??), adapting a recipe from from another Bread a Day post.

Recipe #1: The Bread Bible Pitas
I picked this recipe because she said you could keep the dough in the fridge for up to three days, and I'd hoping some kind of sourdough-ness would develop. That didn't happen. Oh well.
The dough came together fairly easily but was very wet. When I attempted to roll it out, all it did was stick to my rolling pin. I read through the recipe again for ideas and noticed she mentioned how similar it was to her pizza dough, so I just stretched it out with my fingers. So much fail in that idea- the width was uneven, and while it did puff up a bit the thin sections prevented it from reaching its full potential. It's very good for pita pizzas though.
Recipe #2: Whole Wheat Pitas from A Bread A Day
This was a dryer dough that came together easily. I actually adapted it slightly- she let her sponge sit for four hours, I adjusted the starting flour amounts a bit, nixed the early dose of honey (just added it a bit later) and let it sit in my fridge while I was at work. These rolled out a lot easier but again didn't puff. I'm assuming my dough was too dry?
Will definitely be trying these again, I'm a big fan of the quick cooking times for both recipes.
Friday, September 2, 2011
Earring-A-Day 31: Pencils
So of course my last earrings of the month would be posted late, of course. Wednesday is/was office supply day, and it also became an upcycle day. Remember my oh-so-awesome Flying Spaghetti Monster Earrings? Those eraser meatballs came from pencils. Which I saved. As I tend to do with things.
I took those pencils, cut them up, and came up with this:

They're kind of shabby-looking, right? I used a box cutter. It was pretty tedious. I definitely need to buy a coping saw. But they're not bad. I was kind of inspired by this craftzine post, though when I drilled all my lead broke. Ah well. Here's another shot:

I wish I'd had more sections of pencil with writing, as I think it gives a nice touch.
I took those pencils, cut them up, and came up with this:

They're kind of shabby-looking, right? I used a box cutter. It was pretty tedious. I definitely need to buy a coping saw. But they're not bad. I was kind of inspired by this craftzine post, though when I drilled all my lead broke. Ah well. Here's another shot:

I wish I'd had more sections of pencil with writing, as I think it gives a nice touch.
Tuesday, August 30, 2011
The Bread Project Week 10: Basic Hearth Bread
I told a million people I was going to make pita bread, or maybe english muffins, or maybe etc etc etc. The weekend ended up being insanely busy. I enjoyed myself a lot, but unfortunately bigas fell by the wayside. I ended up settled on...
The Recipe: Basic Hearth Bread from The Bread Bible
I picked it since the recipe called for a sponge (like a biga, but wetter) sit out for 4 hours, giving me time to do laundry and go to the gym. I also hoped it would be a nice compromise, flavor wise, between a straight bread and having to wait another three days to make something.
The Result:

There was probably a bit too much flour in my dough but I didn't mind, as it wasn't scary wet while kneading. It turned out fine and probably had the best crust I've made. Next time if/when I make this bread I'll do a freeform loaf or rolls.
The Recipe: Basic Hearth Bread from The Bread Bible
I picked it since the recipe called for a sponge (like a biga, but wetter) sit out for 4 hours, giving me time to do laundry and go to the gym. I also hoped it would be a nice compromise, flavor wise, between a straight bread and having to wait another three days to make something.
The Result:

There was probably a bit too much flour in my dough but I didn't mind, as it wasn't scary wet while kneading. It turned out fine and probably had the best crust I've made. Next time if/when I make this bread I'll do a freeform loaf or rolls.
Earring-A-Day 30: Rubber Ducks!
I picked up these ducks years ago, on a little group trip in college. A bunch of people I worked with were going apple picking, and there was food and stands near the farm. These immediately jumped out at me for earrings, but they say for ages in drawers and boxes as I moved around. It's nice to finally get them made.

Not at all seasonally appropriate, but completely adorable. Wish I had more.

Not at all seasonally appropriate, but completely adorable. Wish I had more.
Monday, August 29, 2011
Earring-A-Day 29: Mini Pin Cushions
When I sew, I have the terrible habit of putting pins in my mouth, mostly because I have no pin cushions. A lazy Sunday gave me the opportunity to create these mini pin cushion earrings with bottle caps, though I've had the idea in my head for at least the past two Mondays.

I love this fabric- I actually made a tie out of it a while back. So adorable, though you kind of look like a 6 year old going to church on Easter. Having some crazy idea turn out well is the best feeling in the world- and they're not too hard to make either.
Materials and Tools:
- Fabric (scraps)
- Bottle Caps
- Stuffing
- Earring Hooks
- Glue
- Pliers
- Scissors
- Needle/Thread
Start with a circle of fabric:

Use whatever needle and thread you have on hand (I had embroidery floss) to sew a quick running stitch around the outside of the circle.

Then tighten the string, creating a pouch.

Fill said pouch with your stuffing of preference and tie it closed:

Create your bottle cap earrings with (the ususal method)- making sure the inside faces front. These caps are plain silver ones we use for homebrew, I didn't take pictures of the other side- sorry!

Put a big glob of glue in the cap and stuff the cushion inside, knot side down. I used Elmer's glue that takes forever to dry, so rubber bands came in handy:

Once it's dry, you have your adorable little pin cushions:

Now I won't have to worry about inhaling pins when I sew! Hooray!

I love this fabric- I actually made a tie out of it a while back. So adorable, though you kind of look like a 6 year old going to church on Easter. Having some crazy idea turn out well is the best feeling in the world- and they're not too hard to make either.
Materials and Tools:
- Fabric (scraps)
- Bottle Caps
- Stuffing
- Earring Hooks
- Glue
- Pliers
- Scissors
- Needle/Thread
Start with a circle of fabric:

Use whatever needle and thread you have on hand (I had embroidery floss) to sew a quick running stitch around the outside of the circle.

Then tighten the string, creating a pouch.

Fill said pouch with your stuffing of preference and tie it closed:

Create your bottle cap earrings with (the ususal method)- making sure the inside faces front. These caps are plain silver ones we use for homebrew, I didn't take pictures of the other side- sorry!

Put a big glob of glue in the cap and stuff the cushion inside, knot side down. I used Elmer's glue that takes forever to dry, so rubber bands came in handy:

Once it's dry, you have your adorable little pin cushions:

Now I won't have to worry about inhaling pins when I sew! Hooray!
Sunday, August 28, 2011
Earring-A-Day 28: Paper
I was a bit stumped for today's earrings, though I guess I always am for studs. I'd gone so crazy preparing for the dud of a hurricane that I there really wasn't much to do today. Most stores were closed, and although it wasn't terrible out I didn't really feel like driving. So I took the opportunity to clean up a bit around the house, and used one of the ad's to make my earrings:

Call it a bonus upcycling day. Also, very easy. Just coiled up strips of paper. Hooray!

Call it a bonus upcycling day. Also, very easy. Just coiled up strips of paper. Hooray!
Earring-A-Day 27: Keys!
Ok, this was a lazy one, but come on- I was preparing for the hurricane! One of the things I wanted to do (which I didn't actually end up doing) was to put my bike inside so it didn't blow away. The problem: I always lose my bike keys. The lock I bought came with two keys- perfect for earrings:

This way they can live in my earring frame when I'm not wearing them so they won't get lost! Added bonus: shiny shiny.

This way they can live in my earring frame when I'm not wearing them so they won't get lost! Added bonus: shiny shiny.
Earring-A-Day 26: Soda Tabs
Friday was upcycle day, and I decided on soda (well, beer- Genny Cream Ale to be specific) tabs. There was an Etsy Labs day where they made bracelets and belts out of tabs a while back, but I wasn't able to attend. I think for that they used elastic- which makes sense for a bracelet, not so much for earrings- so I used duct tape. Here's a front and back view:

Yep, that's the same duct tape as Day 23's. Very easy, and I liked the way they turned out.

Yep, that's the same duct tape as Day 23's. Very easy, and I liked the way they turned out.
Earring-A-Day 25: Birthday Candles
The 25th was my birthday, and although nobody could've blamed me for taking the day off, it was actually very easy to come up with my earrings for the day: Birthday Candles!

You see how they're burnt? I tried to light them while wearing them. Fun fact: the melting wax puts out the flame. Instead I lit them while just holding them, D sang, and I blew them out. Still very cool. And less of a chance of me setting my hair on fire, which is always good.
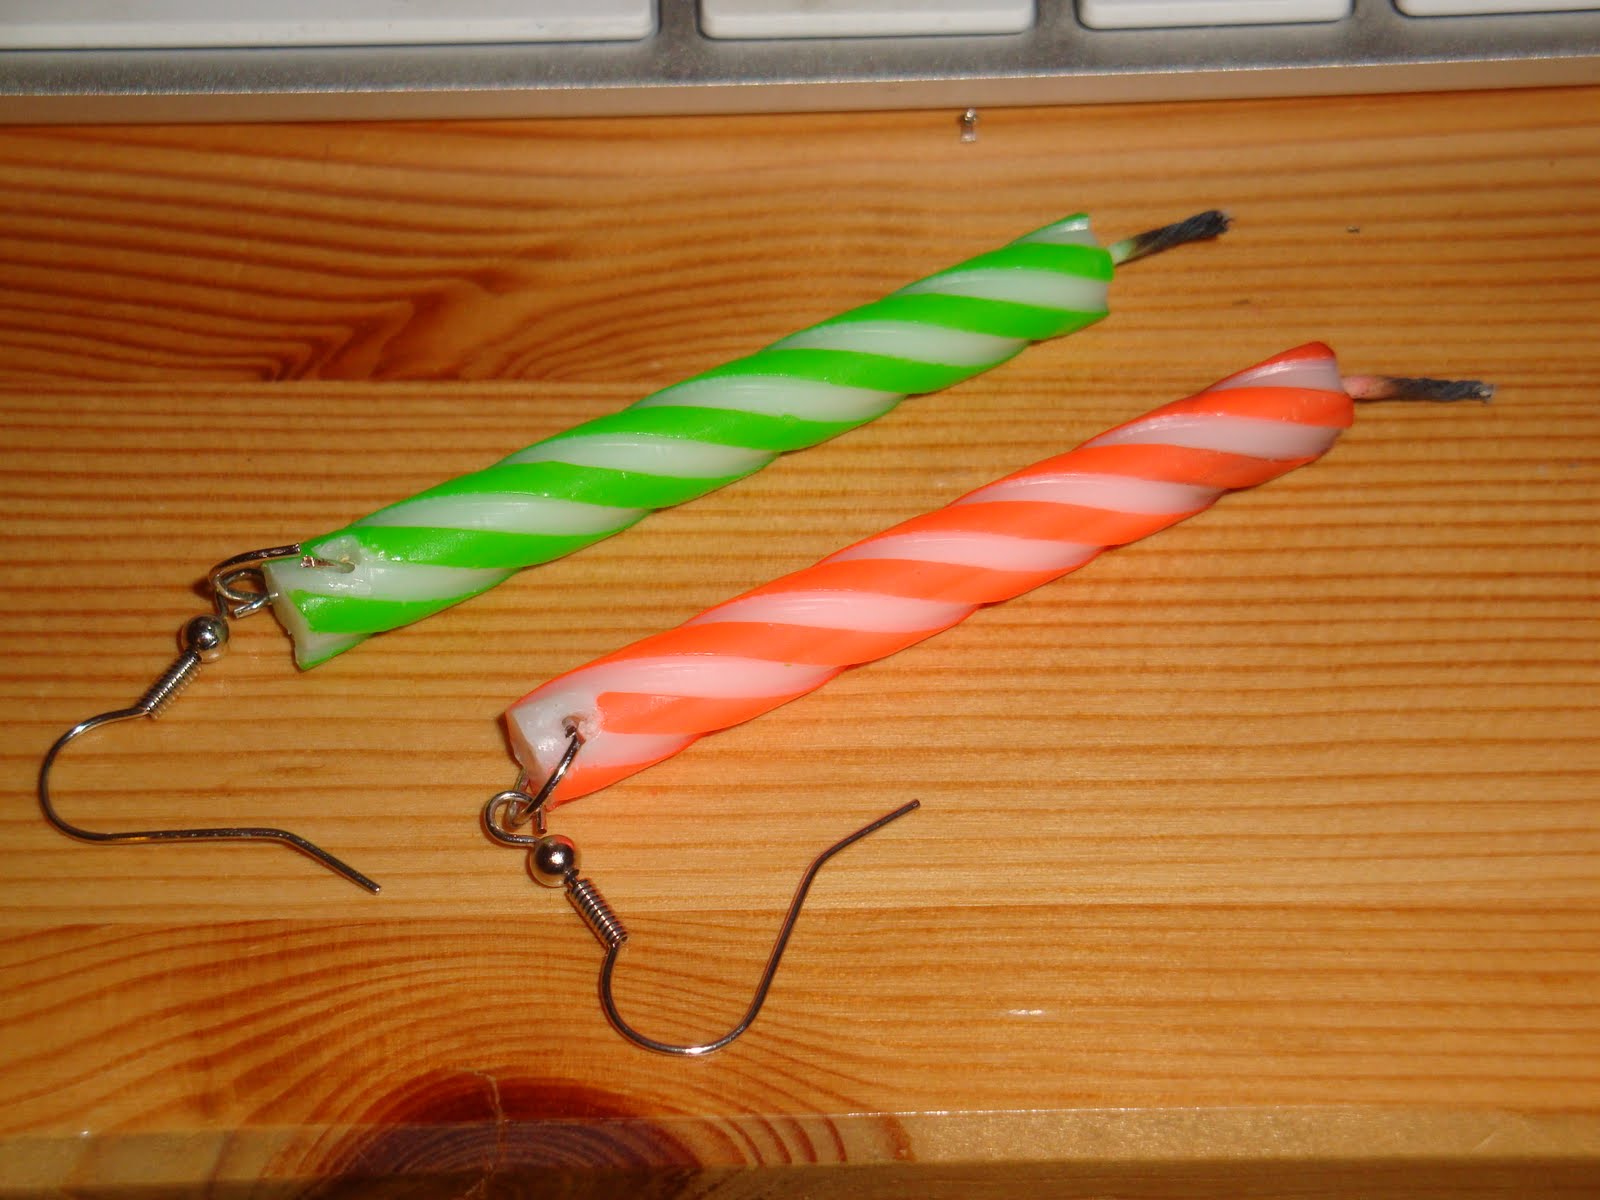
You see how they're burnt? I tried to light them while wearing them. Fun fact: the melting wax puts out the flame. Instead I lit them while just holding them, D sang, and I blew them out. Still very cool. And less of a chance of me setting my hair on fire, which is always good.
Wednesday, August 24, 2011
Earring-A-Day 24: CD Cases
You know how I mentioned two fails in last week's office supply theme post? Well I managed to salvage one of them: CD Cases!

Are CD cases office supples? I think so- especially since I work in operations for a TV network and we use these for DVDs. In my previous position I always ended up recycling a number of these, so they'd even work for a Friday upcycle post, too.
Basically I put these in a reusable shopping bag and broke them. Originally when I took them out I thought the pieces looked too big/obviously CD cases and deemed it a failure. Last night I revisited the idea and broke off smaller pieces by hand. Then it was just a matter of drilling holes in each and looping some wires through to attach the hooks.

Are CD cases office supples? I think so- especially since I work in operations for a TV network and we use these for DVDs. In my previous position I always ended up recycling a number of these, so they'd even work for a Friday upcycle post, too.
Basically I put these in a reusable shopping bag and broke them. Originally when I took them out I thought the pieces looked too big/obviously CD cases and deemed it a failure. Last night I revisited the idea and broke off smaller pieces by hand. Then it was just a matter of drilling holes in each and looping some wires through to attach the hooks.
Tuesday, August 23, 2011
Earring-A-Day 23: Duct Tape Flowers
Another idea I'd had kind of fizzled out last night, but glancing around my room I happened to notice a roll of red duct tape I'd bought in an attempt to patch my rain boots. That attempt mostly failed, but red duct tape is very cool regardless.

I folded over strips to take away the sticky side, then cut out petal bits. I attached them together with that makeshift staple in the center. Kind of wish I'd thought of this for tomorrow, as I could've used an actual staple and saved myself some trouble. Does duct tape count as an office supply?
Anyway, here's another view of the earrings, showing the layers off a little more, and getting my requisite short depth of field picture in.

Purdy!

I folded over strips to take away the sticky side, then cut out petal bits. I attached them together with that makeshift staple in the center. Kind of wish I'd thought of this for tomorrow, as I could've used an actual staple and saved myself some trouble. Does duct tape count as an office supply?
Anyway, here's another view of the earrings, showing the layers off a little more, and getting my requisite short depth of field picture in.

Purdy!
Subscribe to:
Posts (Atom)